Table of Contents
Since Google announced their new Google Analytics 4 platform, many of us knew it was only a matter of time before Universal Analytics would be phasing out. We know that starting July 1, 2023, Universal Analytics will no longer collect new data. Pushing thousands of businesses and individuals to change over to Google Analytics 4.
But how easy is it to set up a GA4 account? Where do you start?
In this blog post, we’ll show you the basics of how to set up your GA4 account from your Universal Account!
Setting up your GA4 account with your existing UA account
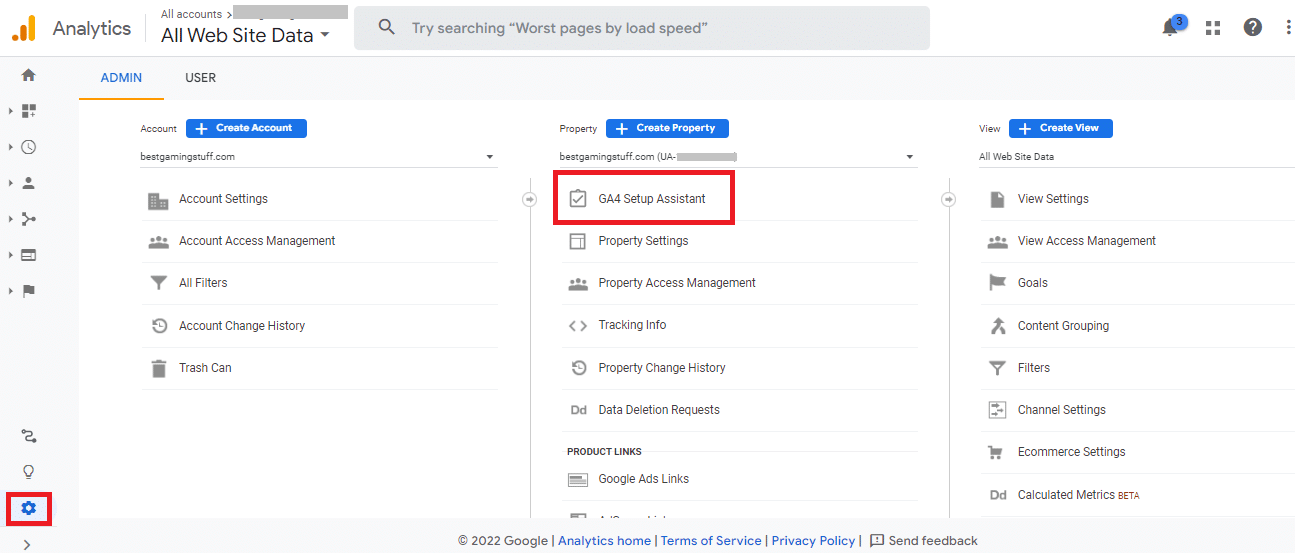
Sign in to Google Analytics and open your Universal Analytics property. Click the gear symbol in the left navigation menu to open the “Admin” page.
On this page, you will see two options. One to set up a new “GA4 Setup Assistant.” Click on this.
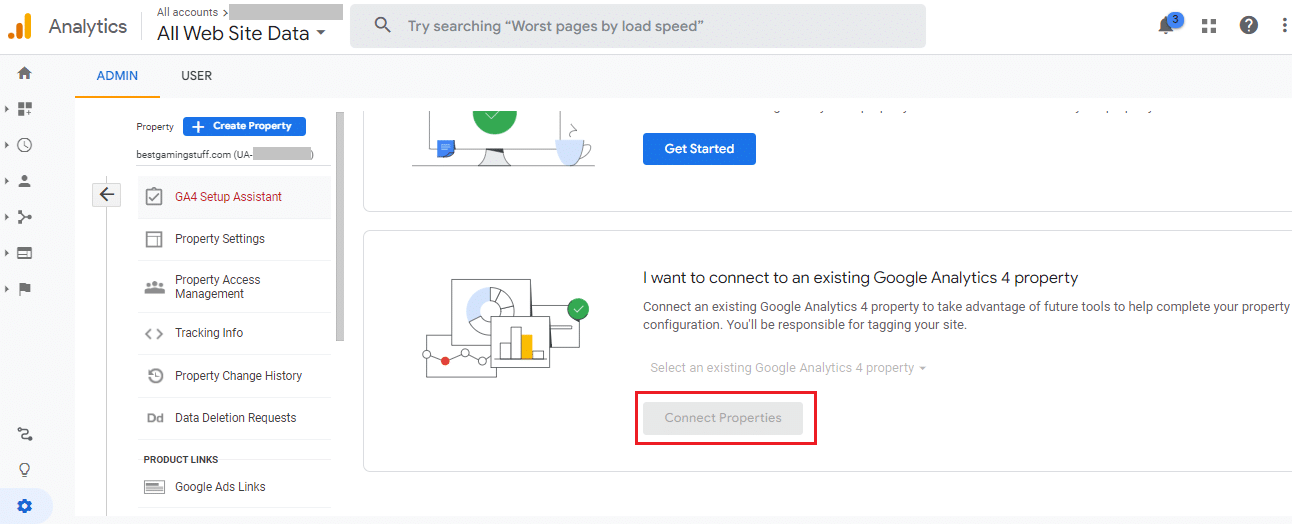
On the next page, you will see two options. One to set up a new GA4 account and another to connect to an existing GA4 account.
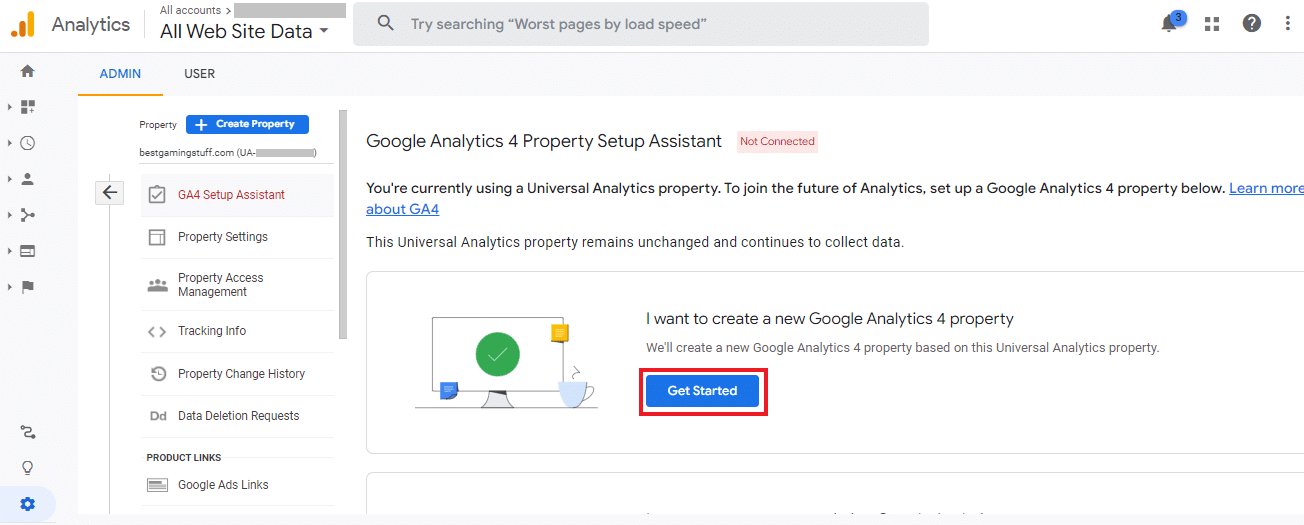
In this blog post, we are covering the first choice — setting up your new GA4 account.
A pop-up will appear when you click the “Get Started” button. This pop-up is telling you what the setup assistant will do. The box under “Optional setup” is automatically checked by Google, and we recommend keeping it.
After clicking “Create Property,” a new page will appear with your GA4 ID number and the name of the new GA4 account.
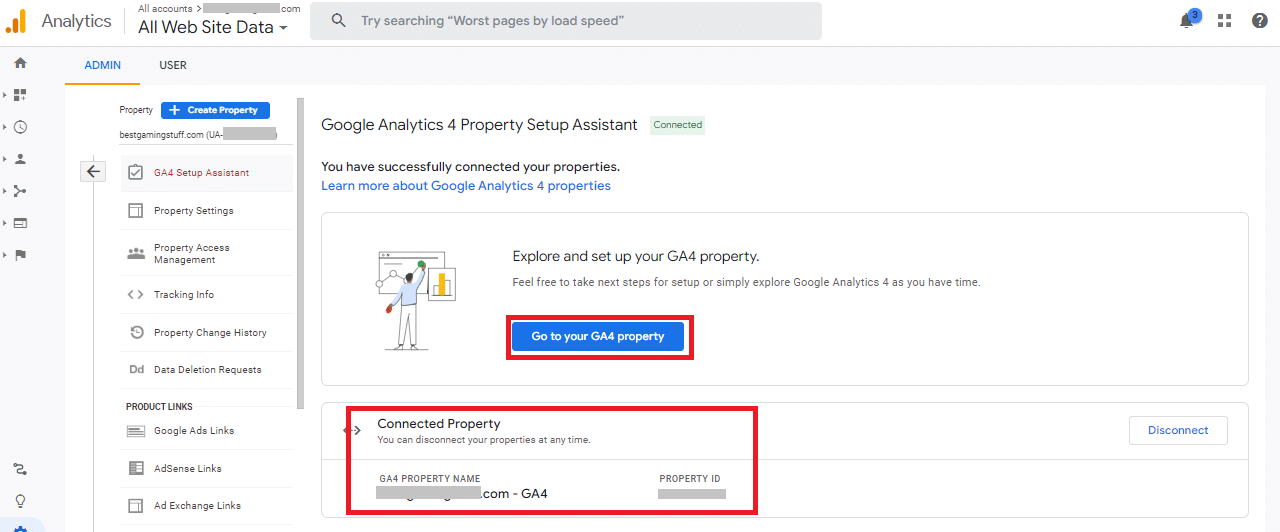
Now that you have created a GA4 account let’s click “Go to your GA4 property” and start setting up your GA4 account!
Setting up your new GA4 account
The first thing to notice when you enter your GA4 property is the different look to the navigations bar on the left. You should also see your new property ID and name in the second navigation bar.
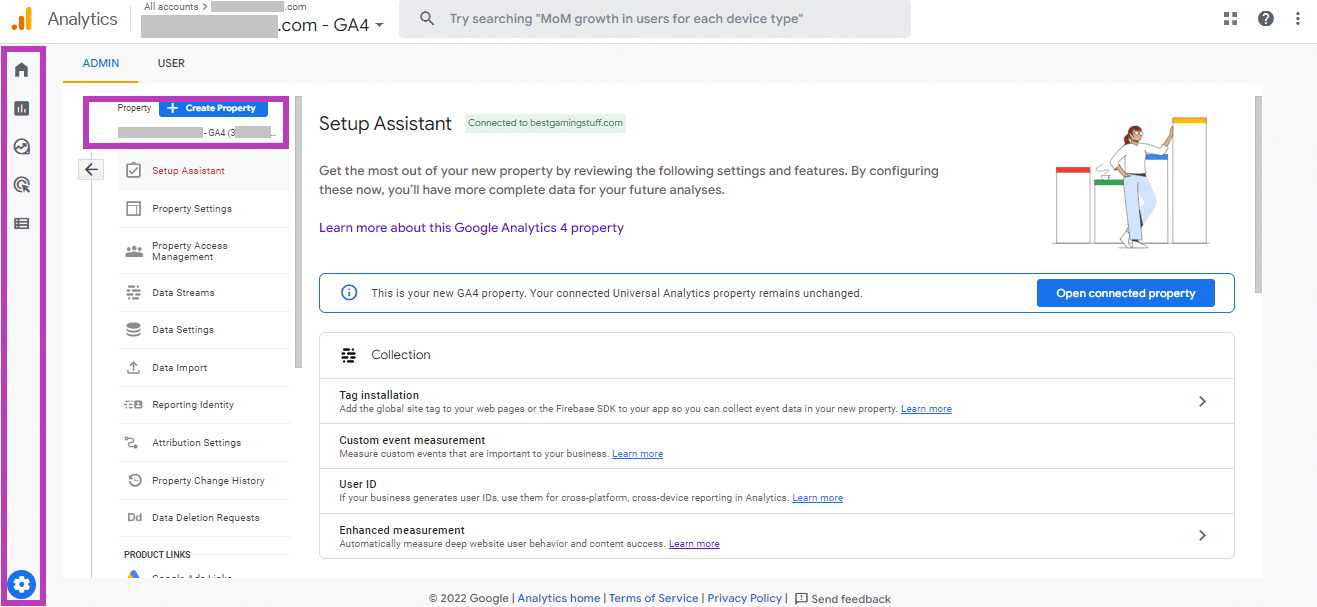
This is the GA4 set-up assistant within the platform’s “Admin” channels to help get you started.
There are five sections:
- Collection
- Property settings
- Linking
- Audiences
- Conversions
- User Management
We’ll walk you through each and explain these sections.
Collection
This part of the GA4 Setup Assistant will ensure that you correctly set up your tags and user ID so that your new property will collect event data. Tags enable you to collect event data from your website and app.
There are two tags for Google Analytic properties, the global tag, gtag.js, and the analytics.js tag. With GA4, adding the global gtag.js tag will allow your new property to collect event data.
This section will collect data if you’re already using the global gtag.js.

If your site is not tagged with gtag.js and uses the analytics.js tag, then the GA4 Setup Assistant can not reuse your existing tag. You will be prompted to add the global tag using HTML or Google Tag Manager.
Setting up Global Tag with Google Tag Manager
One of the best ways to add the global gtag.js is through Google Tag Manager.
Going forward, Google Tag Manager will be increasingly important to track conversions and events. It’s free to set up and well worth the time in the long run. Check out our other blog posts to learn how to set up tags for Google Analytics 4 events and conversions.
But to set up your GA4 tag, we need to follow the assistant’s instructions.
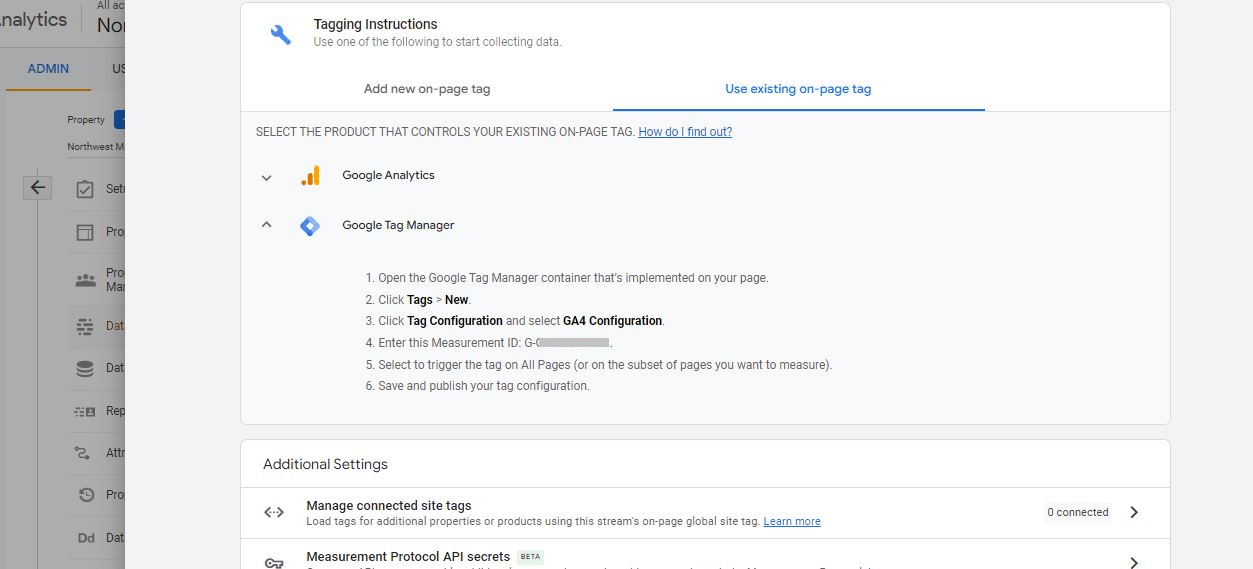
STEP 1: Sign in to Google Tag Manager and open your account property. Click “Add a new tag.”

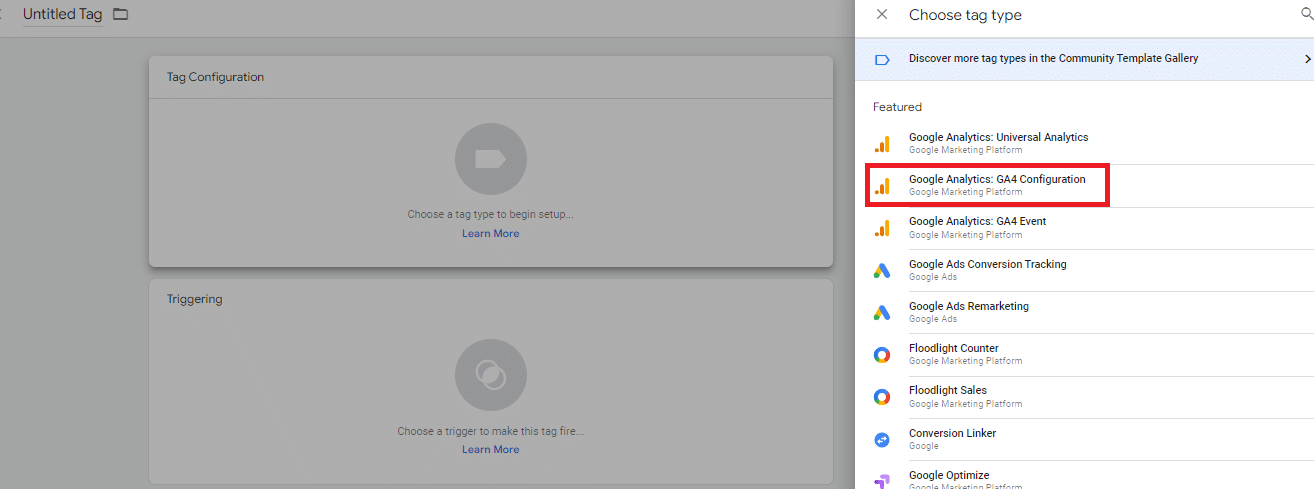
STEP 2: Click “Tag Configuration.”
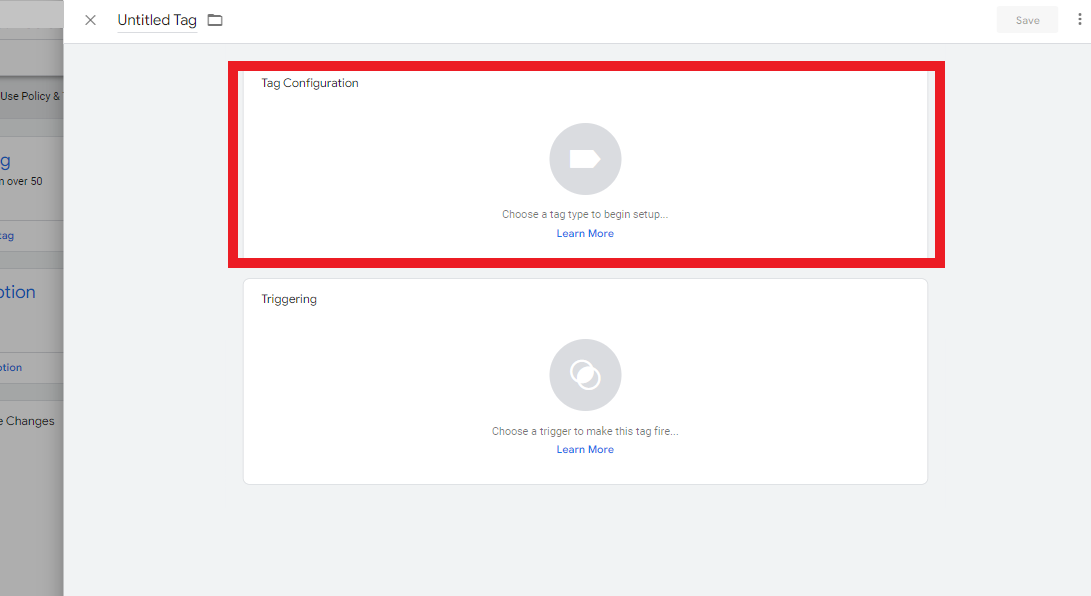
STEP 3: In the new menu bar to the right, choose “Google Analytics GA4 Configuration.”
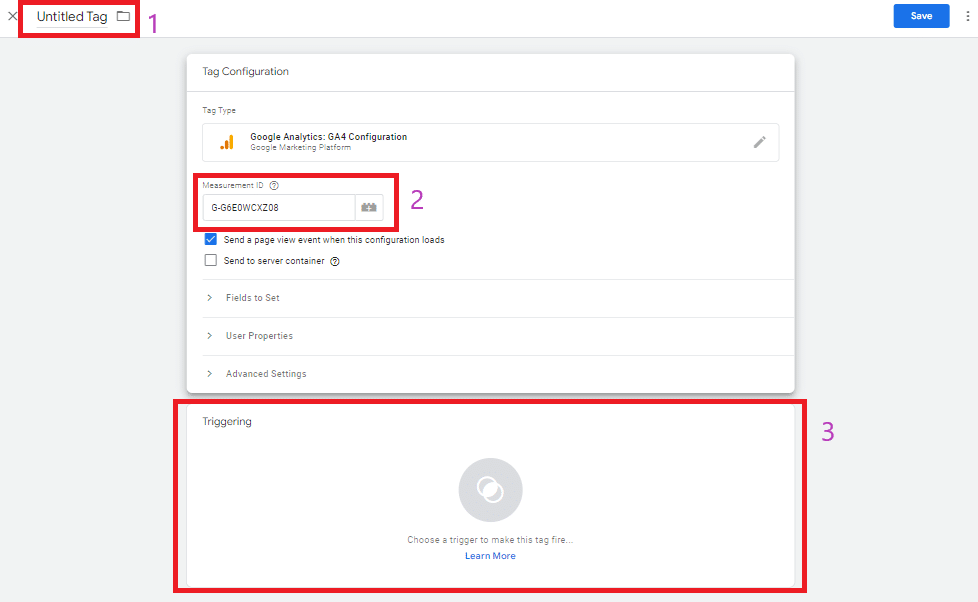
STEP 4: Give your tag a name. Then put in your Measurement ID number. The Measurement ID number is in line 4 of the GA4 tag assistant instructions. Once those two settings are updated, click on the box below to choose triggers for this tag.
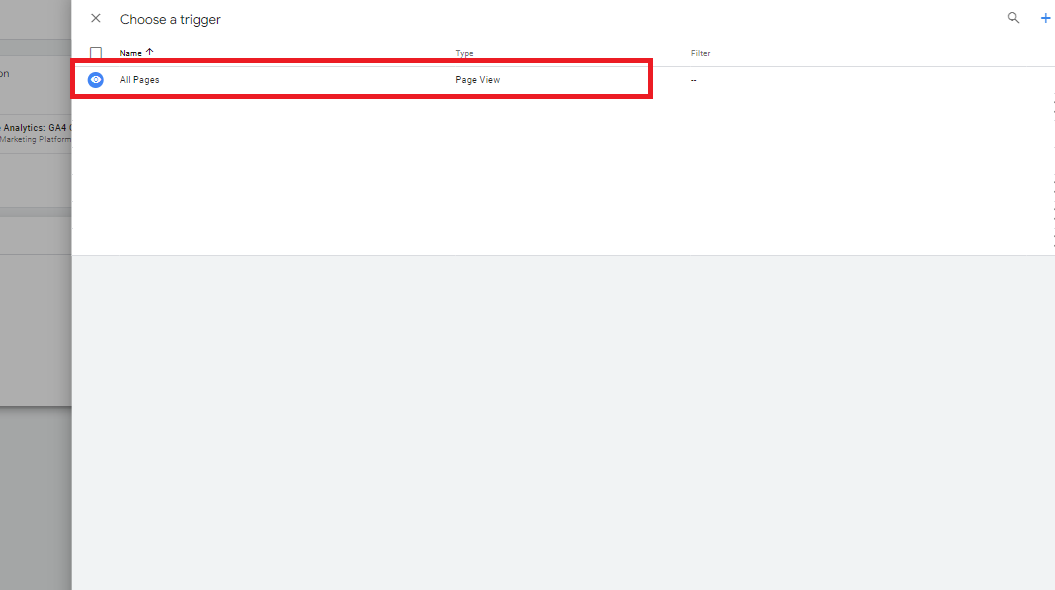
STEP 5: In this new window, it is recommended that you choose “All Pages” as the trigger.
STEP 6: “Save.”
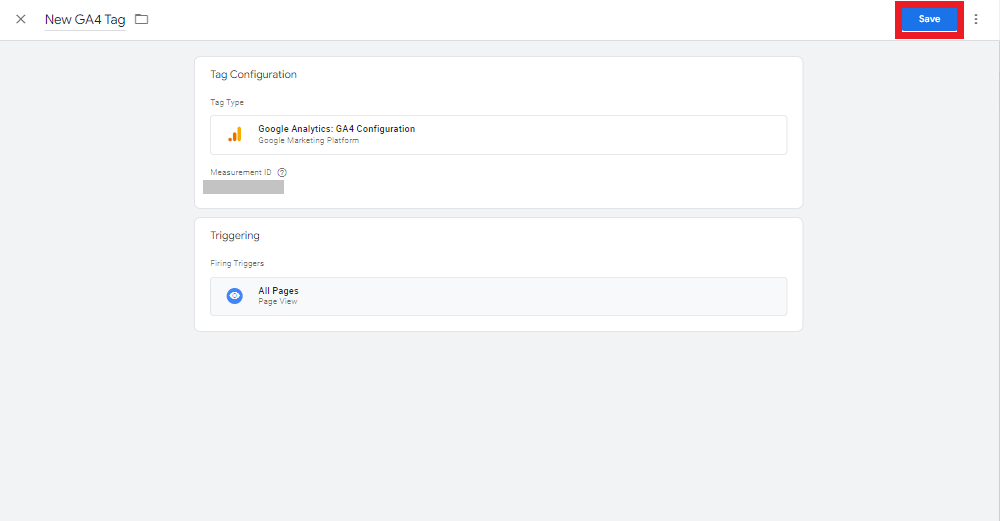
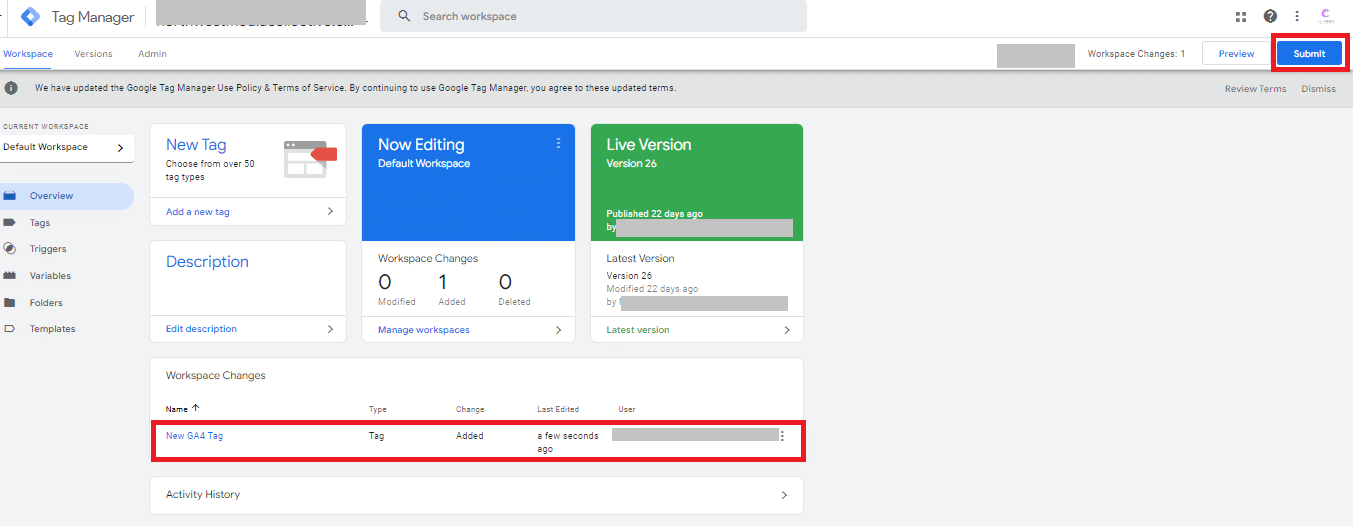
STEP 7: You will return to the home page and see the new tag appear below in the “Workspace Changes” section. Click on “Submit” at the top right corner.
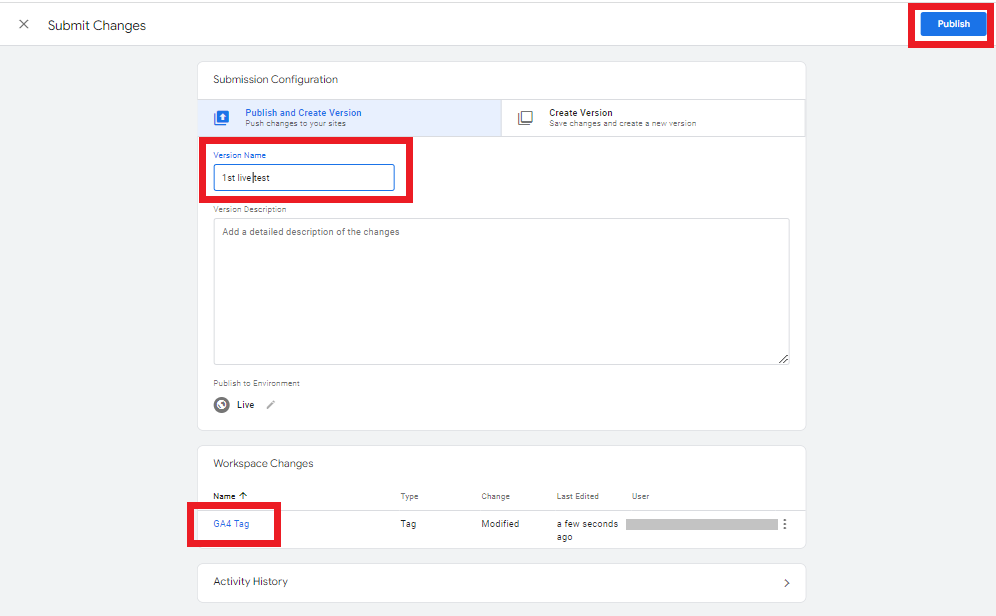
STEP 8: Give your version a name and description if you wish. Then click “Publish.” That’s it!
What if you can’t use Google Tag Manager?
For websites that use a website builder or CMS that tags pages with the analytics.js tag, you’ll need to use the custom HTML to add the GA4 gtag.js. But, be sure to leave the analytics.js tag on your website, too, if you delete it, then data will no longer be sent to your Universal Analytics account.
Check out Google’s help page for more information on tag installation.
Property Settings
In Property Settings, you can collect session data from sites and apps that Google associates with. So now, GA4 can aggregate data from users signed in to their Google accounts and have Ads Personalization on. This will allow for cross-device reporting, cross-device conversion, and cross-device remarketing to Ads.
Check out Google’s help page for more information on aggregating data from Google users using Ads Personalization.
Linking
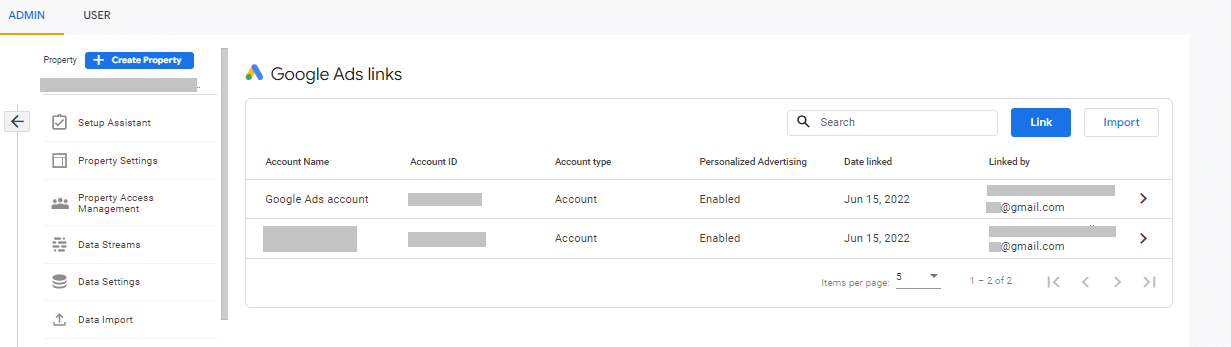
Linking your new GA4 account to your Google Ads will help you see the full customer cycle. You’ll see how your users interact with your marketing strategy and how they complete the goals you’ve set up on your site or app. Connecting to Google Ads will track users clicking ads, making purchases, consuming content, and more.
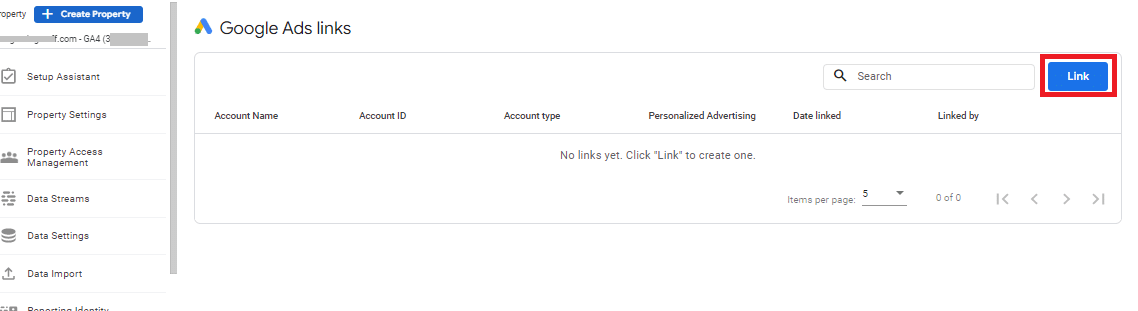
To connect your GA4 property to your Google Ads through the Assistant, click on the small arrow at the end of the row. Click on the “Link” button at the top right corner of the next page.
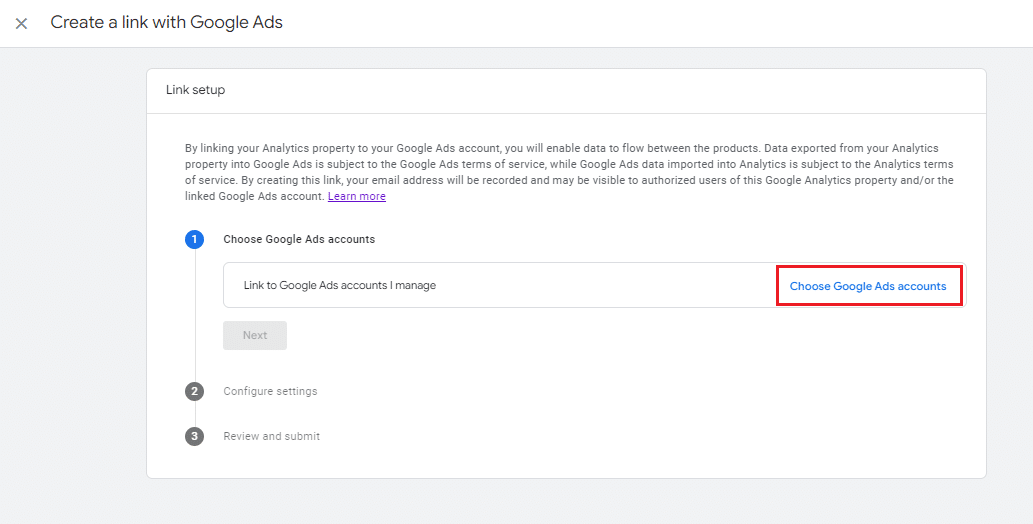
Then choose the Google Ads account you would like to link to.

After reviewing and submitting the change, you should see the Google Ads account(s) you want your GA4 property to link within the Setup Assistant.
BigQuery
Google BigQuery is a data warehouse that manages and analyzes your data. It has built-in features like geospatial analysis, business intelligence, and machine learning. If you have a BigQuery account and property already set up, then linking it to your GA4 property is the same as linking your Google Ads account.
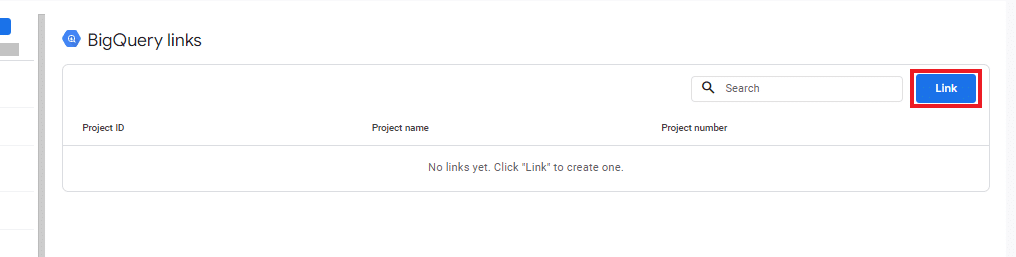
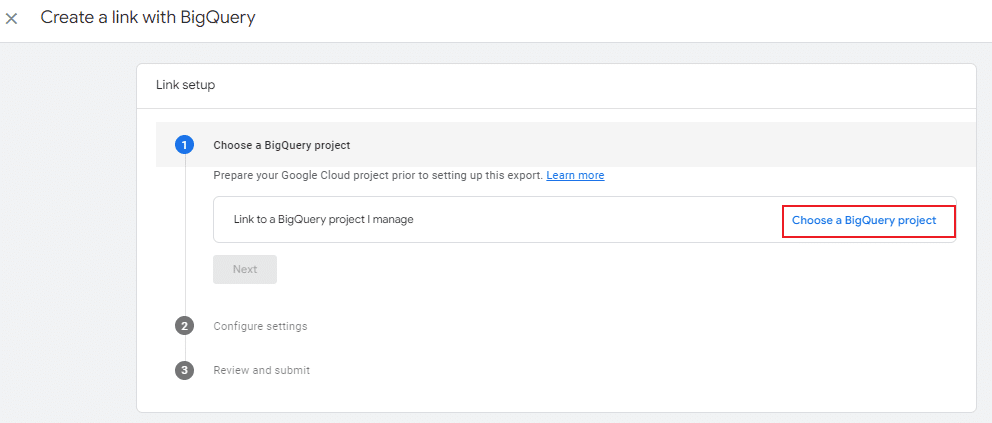
Choose your BigQuery account and submit it to link it to your GA4 property.
Audiences
You can learn new ways to segment your data and remarket to the most engaged users by defining audiences. Possible ways to segment your audience include dimensions, events, and metrics that include any subset of users. As GA4 collects new data on your users, their audience memberships will be continuously reevaluated and updated. So if a user no longer meets the criteria, they are automatically removed from that audience.
Also, if you link your GA4 to your Google Ads and keep the default option to “Enable Personalized Advertising,” your audience is available in your shared library in Google Ads. This way, you can use them in your ad campaigns too.
Click on the arrow in the “Define Audiences” row, and it will take you to the “Audiences” section in GA4:
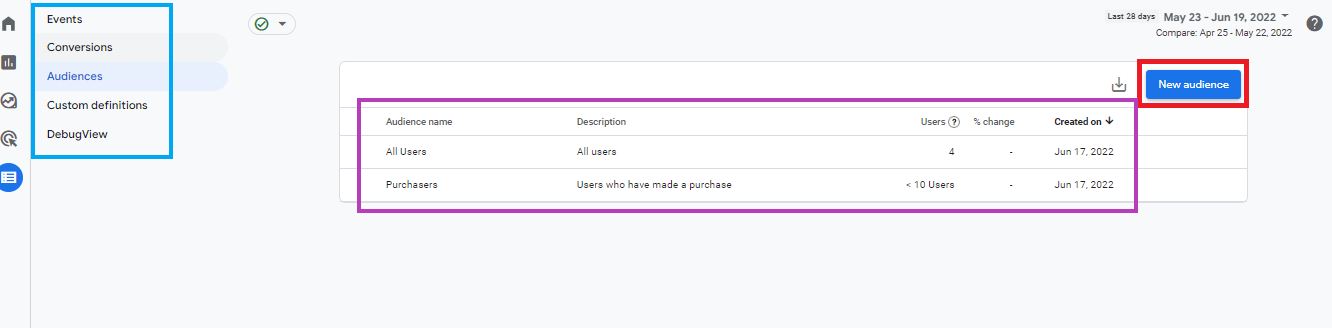
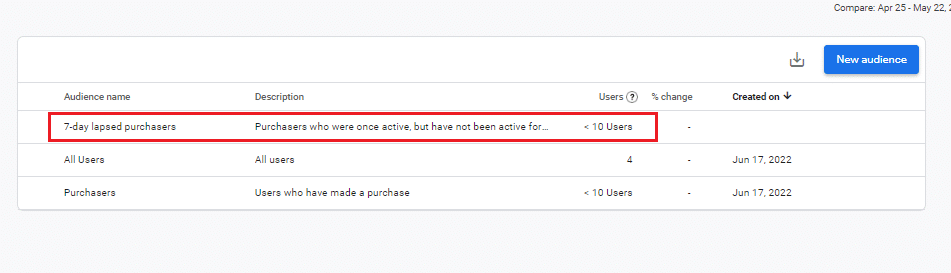
You will see that the navigation section on the left has changed. And if you selected “All Users” when originally setting up your GA4 property, then you should see this as an “Audience Name.”
To create a new audience, click on the “New audience” button no the top right corner.
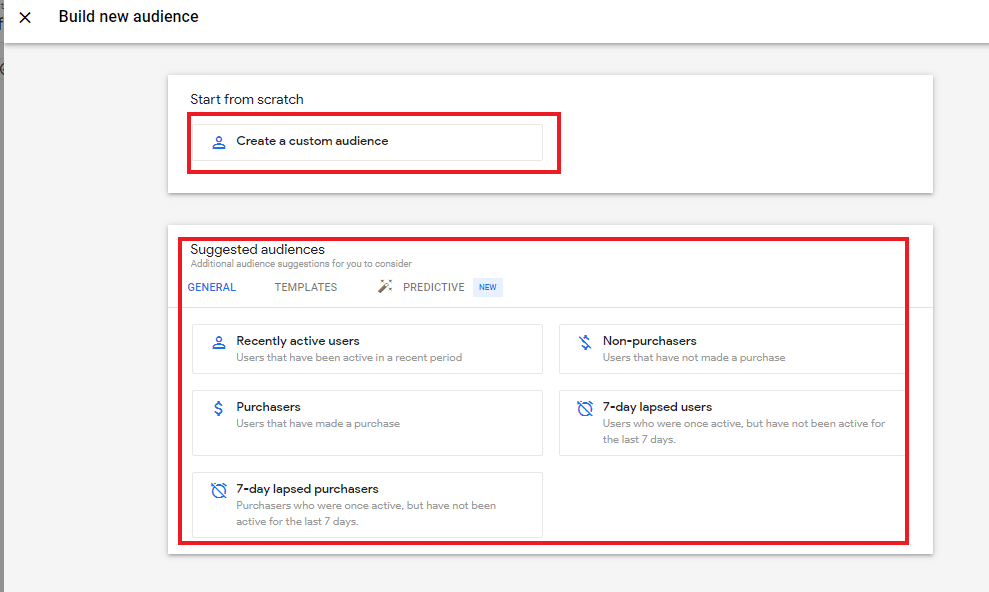
Then create a new custom audience from scratch or choose one of the suggested audiences.
After choosing the audience you want to create, it’s time to choose the settings and parameters.
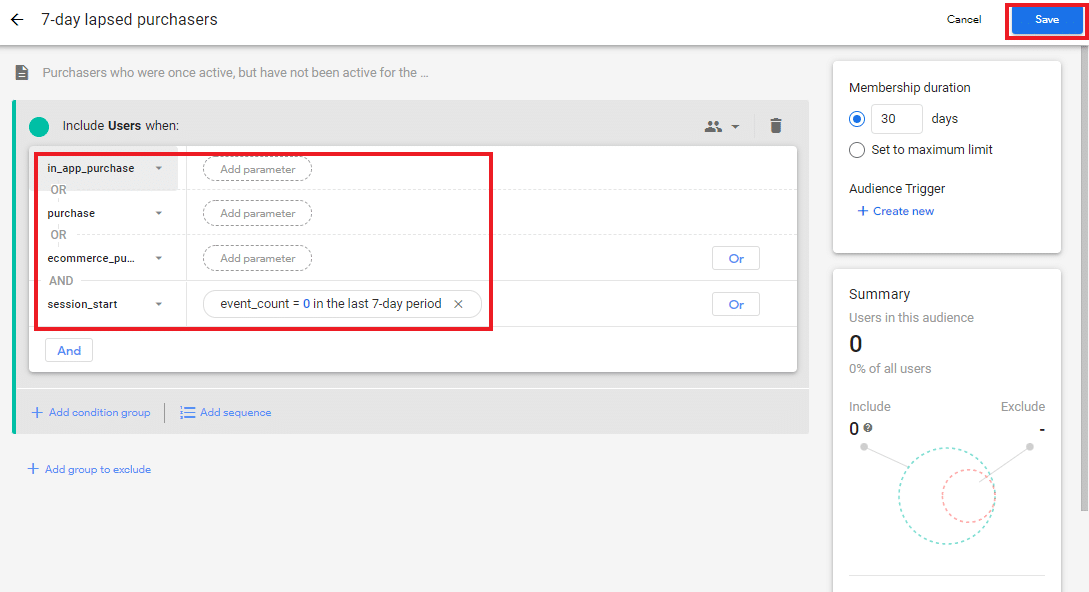
If you choose one of the suggested audience settings, it will automatically be filled in for you, but you can change the settings if you want to customize it. Once you have all your settings in place, hit save, and your audience will appear in the list.
Conversions
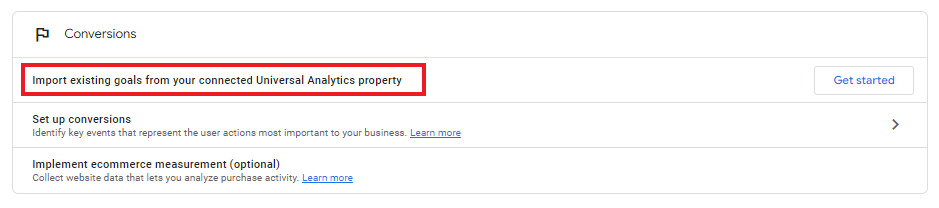
Conversions are the key events that are most important to your business and what you want to track closely. In Universal Analytics, conversions were goals. If you have goals set up for your UA, then there will be a third option to import those existing goals into your Conversions Setup Assistant.
But whether you can import existing goals or need to create new conversions, be sure to read our post “Linking Your UA and GA4 Properties to Google Ads.” You must configure your conversions in Google Ads to record conversion data properly.
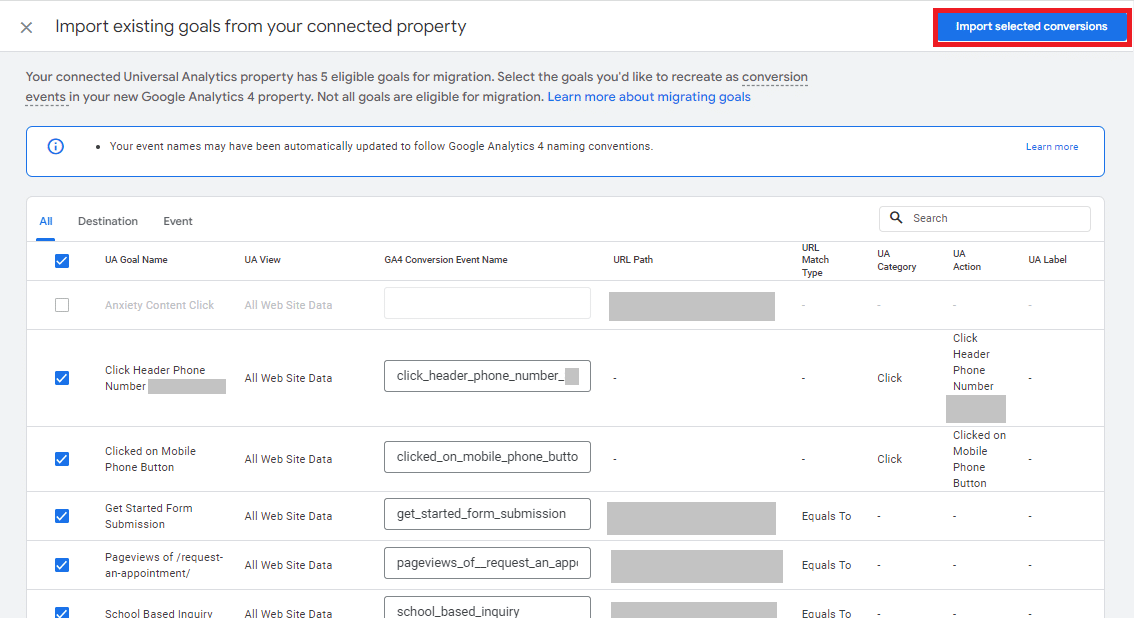
Import Existing UA Goals to GA4
Click the “Get Started” button in the collum. You’ll see a page where all the existing UA goals are listed and where you can choose which ones you would like to import into GA4. After choosing the goals you want to import, click “Import selected conversions.”
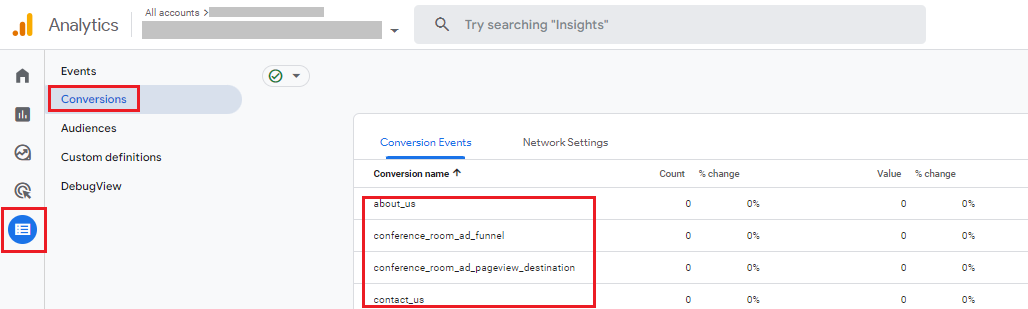
In the left navigation of GA4, click on the “Configure” icon and then “Conversions.” Here you will see all the imported goals from your UA account.
To learn more about creating new conversions in Google Analytics 4, check out our other blog post on creating conversions from scratch.
User Management
The final step in setting up your Google Analytics 4 account is configuring who has access to your new property and grant user management. This setup in GA4 is very similar to how UA User Management set up is.

Click the large “+” button on the top right corner and choose to “Add users” or “Add user groups.”
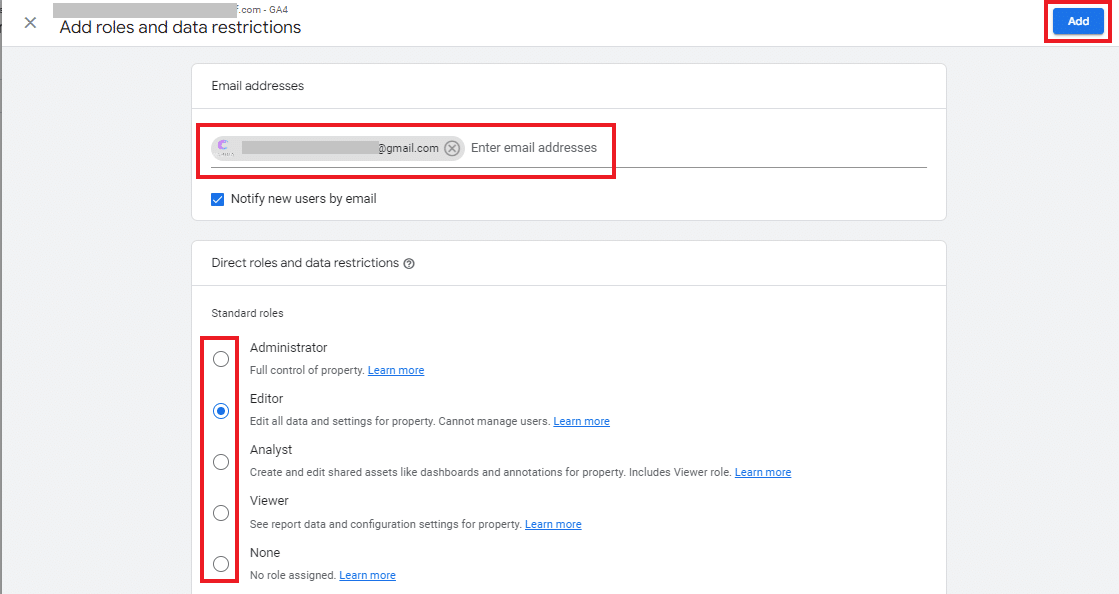
Add the user’s email address and choose the management rights you want to grant for your property. Then click “Add” at the top right, and the user will be sent an email with a link to join you in the new Google Analytics 4 property.
Work with a team to set up your Google Analytics 4 property
Setting up your new Google Analytics 4 account may seem challenging, but with the right team at your side, you’ll have it up and running in no time! At Northwest media collective, we have created a group of Google Analytics 4 blog posts to help you through this process. Our SEO & Marketing team wants to help you succeed in capturing the data you need to understand how your business is doing. Visit our website to learn more about us and our services.