- Login to G Suite Admin console
- Go to main menu >> Domains
- Click Add/remove domains
- Click “Add a Domain or A Domain Alias” on top
- Select “Add a domain alias of $domainname.”
- Enter a domain alias and click “Continue and Verify Domain Ownership.”It will take few seconds, and you will be asked to verify the domain ownership by one of the following methods.
- Add TXT record
- HTML tag
- HTML file upload
- Google Analytics
Choose the one is easy for you. I prefer adding TXT record as it’s easy.
Once verified, you will get a congratulation message about success. Click Continue
Go to Domains again through the main menu, and you will notice the newly added site is verified but Google is recommending to add MX records.
Click on “Set up Google MX records” and follow the on-screen instruction to add the MX record to your domain registrar.
| MX Server address | Priority |
|---|---|
| ASPMX.L.GOOGLE.COM. | 1 |
| ALT1.ASPMX.L.GOOGLE.COM. | 5 |
| ALT2.ASPMX.L.GOOGLE.COM. | 5 |
| ASPMX2.GOOGLEMAIL.COM. | 10 |
| ASPMX3.GOOGLEMAIL.COM. | 10 |
Note: it may take some time to get MX record propagated globally depending on domain registrar.
Well done! You’ve successfully added your additional domain to G Suites as an alias to send and receive email.
Test by sending an email to your newly added domain, and you will notice email is available to your original domain email.
How to Send Email from Alias Domain?
By default, when you add alias domain, you will receive emails on that, but if you need to send email from alias domain, then you got to do the following configuration.
Login to your original domain email
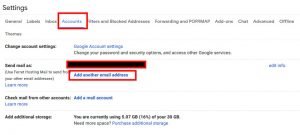
Click on Gear icon at right top and go to settings
Go to accounts tab
Click “Add another email address” under send email as